How to make electronic QSL cards
using Microsoft Word
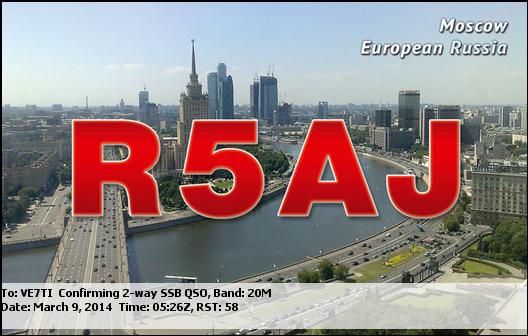
The purpose of this post is to show you how to make a QSL card like this:
On the lower left corner I put a picture of a squirrel, but it can be your picture.
All the components of the QSL card (background picture, callsign, location, table about the QSO, your picture) are in a sandwich – called working with layers. In plain English, that means you can move the components wherever you want, make them smaller, bigger or simply get rid of them. Completing the QSO details in your final QSL card means just opening your Microsoft Word document, and entering the details inside the table, in dedicated boxes. We will get there...
- Start Microsoft Word. Create a new document. Save it with a meaningful name, something that you can remember and locate when you need it.
When you open Microsoft Word 2016 -2019 you will be presented with the following ribbon:
While it is not very visible in the above picture, this is what you see when opening Microsoft Word [click on the picture to enlarge it]. Choose “File” from the upper extreme left.
Double click “Blank document” and the screen will come back to the default display.
- Set the newly created document as a QSL card. That means it has to be a landscape document, of a certain size, with some specific margins (even zero, as in my case).
Click “layout” from the menu, or do the above operations as your different word processor requires.
I put all margins to zero, and I will take care myself not to put any element, except the background, at the extremities. The orientation is landscape and a good size to format is 11 inches by 7.4 inches.
- Save the new document with a meaningful name, something that you can remember and locate when you need.
In the above picture, click “File” (upper left). From the new window click “Save as” and save it somewhere that it is convenient for you. I saved it in the .docx format. It is OK to do it in the old .doc format, too, because we do not have any fancy or difficult elements which to require the .docx format.
- Insert a background picture. Adjust its size and position.
I chose a picture that has good contrast, and allows me to put other components in the QSL card without obstructing the text. If you want to prepare the background in more detail, you should do it in a separate photo editing program. I never bothered with that much work, so I just introduced a picture as background.
From the Microsoft Word ribbon choose “Insert” and after, from the drop down menu “Pictures”. My background picture for this tutorial is from my own computer, but it can be from an external hard disk or from an SD card, USB stick and so on.
I have chosen a picture, and I click “Insert” (lower, right button). The result is not exactly what you probably expected, because the picture does not cover the whole background. I did not pre-process this picture:
I right click in the middle of the picture and from the pop-down menu I choose “Size and position” (just before the last one on the bottom).
From the next dialog I have to choose “Text wrapping” and “In front of text”, and ‘OK”:
This allows me to freely move the background layer. I can magnify or reduce the picture used as background, and also to move it around, to eventually use only the part of it that I want. If you left click the mouse in the middle of the picture and keep it pressed you can drag and drop the picture. Keeping the left mouse button pressed it is possible to use the corner handles of the picture to increase it and decrease it, without changing the proportion. If you did something wrong use the “undo” button from your word processor, or CTRL and Z together from your keyboard.
I finally got to:
- Insert the callsign and follow the same steps described for the callsign in order to add any more text you want to the QSL card.
It is the high time to add the callsign. From the same “Insert” menu of the ribbon I chose “WordArt” and from the drop down choices I chose something that looked nice to me:
I have to go into the WordArt box to type. It is text like any other text from the word processor, so you can increase the font and so on with your normal tools in Microsoft Word or whatever alternative you use. In order to move it freely, right click and choose “Wrap text” and “In front of Text”:
This allows me to move the callsign wherever I want. I select the callsign by putting the mouse somewhere at the outside extremities until I see a cross sign. Now I can left click, keep the button pressed, and drag the callsign to the position I want.
Often I click to select the callsign box and instead I select the background. I just UNDO and try again to catch the right element.
Following the same procedure as adding the callsign to the QSL card, I added my location, and placed it under the callsign. Use your creativity.
Do not forget to switch the ribbon from “Insert” to “Home” to increase or reduce the font size, its color and so on:
Your QSL card now should now look something like this:
- Create a table where to write the QSO details.
Perhaps other word processors allow you to directly insert a table into the document, but Microsoft Word 2016 – 2019 would not allow the insertion of such a table in the QSL card document we created. Not directly; we will have first to create a text box, and inside the text box we will be allowed to create the table.
We click the “Insert” tab on the ribbon:
Now we click “Insert Text Box” from the right of the ribbon, and select a simple text box.
The text box can be dragged and resized. We can do this because it is created as “In front of text” by default. Otherwise we would have to right click on it and set it as “in front of text”. The box will be white, but in the end we will make it transparent. Select the sample text from inside the box and delete it.
We will place a table inside the box, with 2 rows and 6 cells.
A table will appear inside the text box. If Microsoft Word does not let you do that it means the text box was no longer selected. Click inside the text box, and then insert the table. Type the headers and some example text into the table. Resize everything, and align the table and the text box in which the table exists however you want to.
Eventually, you can declare the QSL card finished. I prefer to make some formatting touch-ups. Left click once inside the table. Right click on the table and select table properties:
Format your table as you want from in the next dialog box:
I especially play with “Borders and Shading” (lower left button). I make the border colour white,and the width 3 points:
So, now the table is like this:
We should make the text box 100% transparent. Right click on it, and from the new dialog box select “Format shape” (bottom):
On the right of the page you will have a new formatting box where you can move the slider for transparency to 100%. The box will disappear from our card (it is there, but it is transparent). We can also format the outside border to haves no line. Table borders are white, and the text inside is black, so not very visible. Let’s select all the text and also make it white. (Because of the dark colour, it can be difficult to see if the text becomes selected or not; just select it – even if you are not sure you really selected it – and make it white. Most probably you succeeded.)
Following the same procedures described above, you can add pictures, text and so on. Just remember that Microsoft Word will likely freeze the new elements you inserted into layers of your card. You have to select the new element you just introduced, right click and choose “Wrap Text” “In front of the text”. Our card is now finished, and we can save it.
- How do you use your new QSL card? Open the .docx document. Click inside the table, in the cells where you want to modify the text (another callsign for your contact, another date and so on). Save the document, preferably as a .PDF file, and send it.
~ Daniel Romila VE7LCG